
- Home
- About
-
Products
- ProductsFuhua 16 ton special d
- Drum type film cleaning and in
- CNC brake pad (bending pad) dr
- CNC brake pad drilling machine
- CNC brake pad drilling machine
- Multi function CNC internal ar
- CNC brake pad external arc gri
- Brake pad (Mechanical) externa
- Brake pad limit line edging ma
- Brake pad sampler
- Other products
- Videos
- Custom
- News
- Contact
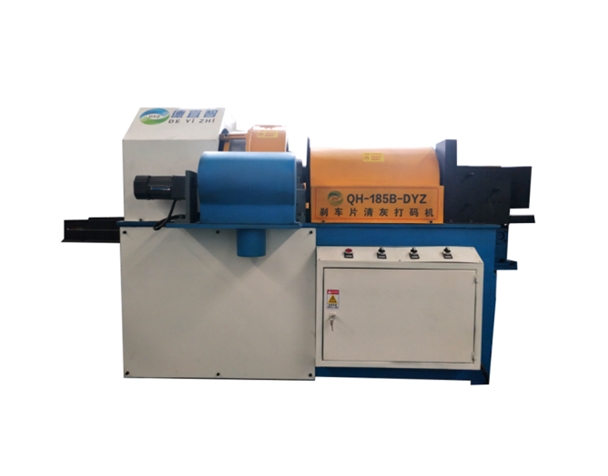
"Dewang brand" cleaning and coding machine instruction manual
1. Function and scope of application
This machine is a cleaning and coding machine designed and manufactured for the production and processing of drum brake pads. It can perform internal and external arc cleaning, coding, LOGO printing and other processes in the post-processing process of brake pads, and then send it to the next process. Packaging equipment is used to package products. Each action program of this machine is precisely controlled by PLC program controller.
2. Features of this machine
(1) The machine has high production efficiency and can realize multiple functions in one machine. It can realize multiple processes such as inner arc, outer arc cleaning, LOGO printing, inkjet or laser coding on one machine at the same time (jet printer). The manufacturer is free to choose and assemble, and the machine has reserved inkjet position).
(2) The machine can be used alone to complete the above functions, or it can be combined with online processing and automated production lines to realize automated assembly line production;
(3) All functions of this machine are fully automated, which automatically realizes the processing of each station and the precise transportation and positioning of workpieces between each process, which improves the production efficiency;
(5) Each process adopts a closed dust extraction device to extract the dust generated by processing to realize clean and automatic production.
(6), according to the user's needs, optional inkjet or laser coding; a LOGO printing mechanism is installed to realize one machine with multiple functions and reduce the cost of repurchasing equipment.
(7) Adapt to the width of the surface. If a small amount of adjustment is made appropriately, it can be adapted to the processing and production of drum brake pads of various varieties and specifications.
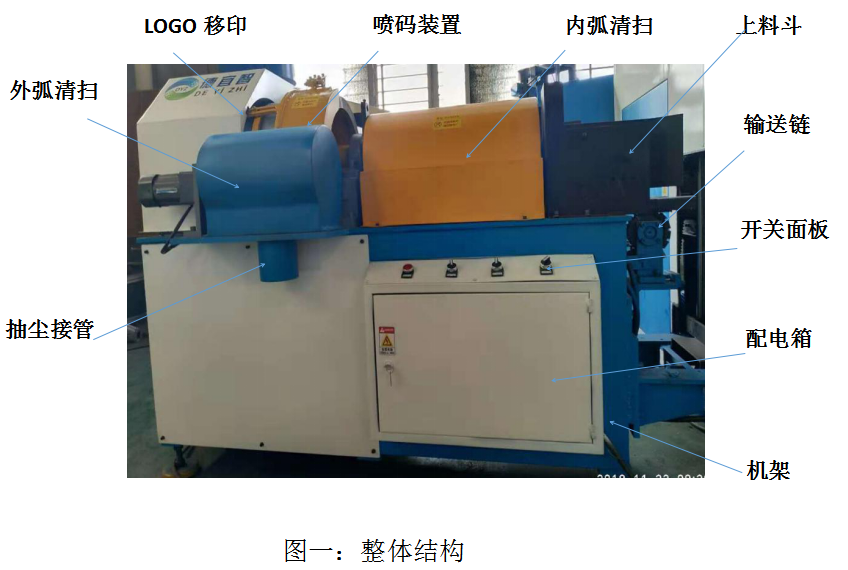
3. Machine structure
This machine is mainly composed of six parts, namely: frame body, conveying part, coding part, pad printing part, sending out stacking part, and dust extraction part. Some functions are shown in Figure 1:
Fourth, the main parameters
1. Processing range: R142~R240mm, width 80-240mm;
2. Main motor power: 0.75KW/380V;
3. Processing efficiency: 1 person can operate 3 units;
4. Dust extraction rate: 93%;
5. Power of the whole machine: at full load, the power of the whole machine is ≈ 1.6 KW/H
6. Working efficiency: 5~26 pieces/min (adjustable)
7. Machine tool weight: 1300KG
5. How to use
1. Function of panel operation switch
(1) Power switch
Turn on the main power switch, the power is turned on, the indicator light is on, and the work can be performed;
(2) Start-stop switch
This switch is turned on, the dust cleaning and coding mechanism starts to work, the drum rotates, and after the brake pads are placed in the feeding box, the parts can be automatically sent and coded, and the brake pads are directly sent out by the cylinder after coding;
(3) Push--stop--pad printing switch:
The switch is rotated from the stop to the pad printing position, and the pad printing machine part starts to pad printing. After each brake pad is sent, the machine automatically issues an instruction to print the LOGO. This part can be used according to the needs in the work. If the product does not need to be printed with LOGO, turn the switch to the push pad. This part of the mechanism only stops the pad printing, but does not affect the delivery of the brake pads.
(4) Wheel hub reverse button
This button is usually also used as a power indicator light. It lights up when there is power and goes out when there is no power. If the hub and conveyor chain card or other reasons need to be reversed during work, you can manually click this button. At this time, the hub is reversed, and the conveyor chain Rewind.
2. Preparations before starting
Before starting the machine, determine the type and size of the brake pads to be processed, and take a sample brake pad
Trial operation mainly depends on whether the width and height of the side baffles of the feeding box are adjusted properly, whether the feeding guide rails and side baffles are adjusted properly, whether the limit ring on the hub is adjusted in place, and whether the LOGO logo pad printing position meets the requirements, etc. , these contents are also the contents that must be checked when the machine changes the product model (see the following for the specific adjustment method).
3. How to use
Turn on the power switch, turn on the start-stop switch, and the machine starts to run. When the product needs pad printing, the pad printing switch should be turned on at the same time. After everything is running normally, the brake pads can be stacked in the discharge box for normal work. If pad printing LOGO, it is necessary to check the amount of ink in the ink cup in advance, and add it if it is insufficient. If the machine is not used for a long time, the ink is too thick and needs to be diluted to achieve the best pad printing effect when it is activated again. The optimal running speed of the whole machine is 5--26 pieces per minute. If you want to adjust the running speed, you can adjust the inverter knob in the distribution box, and at the same time refer to the frequency number displayed on the inverter display to select the required running speed. . In this way, the actual running speed of the device can be controlled. Due to the limitation of the response speed of pad printing and coding, the maximum working efficiency of this machine is no more than 26 pieces per minute, so as to ensure stable work, otherwise it is prone to brake pad accumulation and jamming due to too fast (work efficiency at the factory Adjust at around 25 tablets per minute).
4. Adjustment
The machine generally does not need to be adjusted under normal conditions, but after changing the brake pad model, it is necessary to adjust the equipment according to the length, width and thickness of the brake pad to make the machine work more stably without problems.
(1) Adjustment of the feeding box: The adjustment of the feeding box mainly includes width adjustment and thickness adjustment. The width adjustment is to adjust the adjustment plates on both sides of the upper box to ensure that the distance between the two adjustment plates is about 10mm wider than the brake pads. , In addition, it is necessary to adjust the thickness adjustment plate of the feeding box. The specific method is to loosen the adjustment plate screw and adjust the height of the adjustment plate so that only one brake pad can enter the conveying guide rail at a time.
(2) Adjustment of guide rails and side baffles:
The distance between the moving guide rails of the brake pads on both sides of the conveyor chain can be adjusted. The purpose of the adjustment is to make the brake pads on the conveyor chain stick to the conveyor guide rail to make the conveyor chain transport the brake pads more stably; adjusting the side baffles on the guide rails can limit the brake pads The left and right movement during the conveying process ensures that the brake pads can be accurately sent to the hub. The adjustment method is also to loosen the fastening screws of the side baffles, and then tighten the screws when the position is adjusted properly.
(3) Adjustment of the pad printing position of the LOGO logo: Due to the large change in the width of the brake pads, the position of the pad printing head is fixed, so after changing the product model, the position of the pad printing logo is not necessarily an ideal position. This is where adjustment is required. The specific adjustment method is as follows: adjusting the feeding piece can adjust the cylinder stroke, and by adjusting the stroke size, each time the brake pad stays at a different position, and finally the pad printing position on the brake pad is just right below the pad printing head.
(4) Adjustment of the position of the hub retaining ring: The hub retaining ring can be adjusted along the direction of the hub axis, mainly to adapt to the different widths of the brake pads to ensure that the distance between the end face and the jetting dock meets the coding requirements during coding.
(5) Adjustment of the photoelectric switch of the opposite shot: The brake pad on the drum leaves the drum and enters the LOGO printing chute after coding, and is pushed out by the pusher cylinder. The shooting switch must ensure that the light spot is aligned. If the offset is too large, it cannot effectively sense whether the brake pads are in place or not, which will affect the normal work, so it needs to be adjusted. When adjusting, just align the infrared light emission spot at one end with the receiving window at the other end. To check the effect of the adjustment, you can quickly block the light source by hand in the power-on state, if the cylinder can operate normally.
(6) Reinstallation adjustment after the chain is disassembled: Since this machine needs the precise coordination between the conveying chain and the wheel hub, so as not to cause the input brake pads to conflict with the push block on the wheel hub, so the adjusted machine cannot mobilize the various transmissions at will. The relative position between the chain and the sprocket, otherwise there will be a card or a situation that cannot be transported at all. However, sometimes the sprocket chain must be removed during repair. How to ensure the relative correct position between the chain sprockets during installation? There are two methods: one is to mark the installation position of the chain and sprocket when disassembling, and then just put it back in place during installation; That is: first remove the commutator drive chain, put a brake pad with a width of about 220mm and a chord length of about 200mm into the conveyor chain, and slowly feed it under the hub. When it is just in place, turn the hub to make one of the stops in the hub It is just about 30mm away from the edge of the brake pad. At this time, press the chain joint that drives the commutator without moving the wheel hub and the conveyor chain. After connecting, idle it for a while, if it is suitable. If it doesn't fit, make minor adjustments.
6. Maintenance
1. When changing the brake pad model, be sure to adjust the adjustment parts first to ensure that the brake pads can be transported normally and will not be stuck.
2. If there is a fault such as a card, it should be stopped immediately to prevent damage to the machine.
3. Pay attention to cleaning dust regularly and keep the cutting table clean and clean;
4. Regularly check the connection of various moving parts to prevent loosening.
Related Products


Related News
More>>- Director Luo of Zaoyang Science a... 2016-02-29
- Hubei Deyizhi Precision Machinery... 2020-05-08
- The specially invited representat... 2020-05-08
- Hubei Province announced the seco... 2020-05-08
- Deyizhi's products are famous ove... 2020-05-05
- Lei Jianbin and other leaders of ... 2018-12-19
- Hubei Deyizhi Precision Machinery... 2017-05-12
- Zaoyang Invention Association was... 2016-11-08
- Mr. Wang Yao, President of China ... 2016-08-21
- Zaoyang City is currently in full... 2016-03-11

Mobile Web
Telephone
0710-6167228
Address:Science and Technology Incubation Park for Small and Medium - sized Enterprises in Zaoyang City, Hubei Province
